
Installation
AUTOWBRAKE INSTALLATION INSTRUCTIONS
We recommend having a dealer or installation professional install your Autowbrake Trailer mounted electric brake controller. If you want to do it yourself, watch the videos and follow the instructions below. (Not designed for motorcycles and bikes) Downloadable PDF
Autowbrake Featured on Motorhead Garage
Autowbrake 2023 Installation Update & Battery Usage Info
Connecting & Mounting the Autowbrake to the Trailer + Wiring
The Calibration Process & Selecting + Changing Your Settings
How You Sync Your Key Fob to the Autowbrake
Trouble Shooting and Some Hints to Help You With Setup
Selecting The Right Mounting Option For Your Autowbrake
Warranty on Trailer Mounted Electric Brake Control and Key Fob
**NOT DESIGNED TO USE A MOTORCYCLE AS A TOW VEHICLE **
Installation Instructions
Tools required for Do It Yourself Installation
- You may need a voltmeter with 20V setting to identify trailer / vehicle hitch wires (12 volt rating available at most hardware stores)
- Wire connectors/ wire nuts, electrical tape, #10 hex head socket or screwdriver
- Packing list includes 5 #10 hex head self-tapping screws
- 1 cable clip
- 1 Key fob remote
- 1 Autowbrake Trailer Mounted Brake Control
WARNING: Failure to properly wire the Autowbrake to the correct wire function on your trailer may result in product failure and WILL void your warranty. We recommend having an industry professional install your Autowbrake for you.
Step 1: Select Mounting
The Autowbrake can be mounted any direction and any angle which provides a lot of freedom on installation location. We recommend locating the Autowbrake close to the junction box (usually on the trailer frame). ** If you cannot locate the junction box on your trailer check the inside compartments or trace wires to the junction box on your trailer (possibly inside compartment or inside trailer).
Step 2: Identify Autowbrake wires and trailer wires
Update the trailer wire color column in Table 1, noting the wire color to the trailer function. It is important to verify correct trailer wire functionality. **Use your trailer manufacturer owner’s manual (most available online) for your specific trailer colors codes and verify with voltmeter. **
|
Autowbrake |
Trailer Junction Box |
|||
|
Wire Color |
Wire function |
Trailer function |
Wire Color |
|
|
White |
Ground wire |
Connects To |
Ground |
|
|
Black |
Power |
Connects To |
12V power (See Note) |
|
|
Red/Green |
Left Turn Signal |
Connects To |
Left Turn signal |
|
|
Brown/Yellow |
Right Turn Signal |
Connects To |
Right Turn signal |
|
|
Blue |
Electric Brake output |
Connects To |
Electric Brake |
|
Table 1
Note: Power source
DO NOT USE TRAILER BATTERY OR BREAK AWAY BATTERY FOR POWER SOURCE
Autowbrake wire color/ function
When using this option, you must have your vehicle lights turned manually to the on position, and not use the automatic light feature. You must also know if you fail to turn the tow vehicle lights on while towing you will also not have functioning trailer brakes.
Step 3: Connect Autowbrake to trailer wiring
Connect all Autowbrake wires to the matching labeled wires on the junction box or hard splice to trailer wire harness using Table 1 as a guide.
!!DO NOT CONNECT ANY POWER TO THE GROUND (WHITE)WIRE EVER!!
Step 4: Mount Autowbrake to trailer
Step 5: Calibration (2-person process)
Calibration is required the first time you install your Autowbrake. The calibration process is a ONE-TIME process. Recalibrate again only if the Autowbrake is relocated to another trailer or moved to another position on the trailer.
NOTE: We recommend calibrating Autowbrake on a level driveway or road surface.
Calibration process.
- Connect the trailer to the tow vehicle.
- Plug in trailer harness to tow vehicle.
-
2 People required - One person gets in the vehicle, turn vehicle ignition to on position and press the brake pedal down. (Make sure vehicle lights are on if using Option 2 for installation / lights as power source)
- While the brake pedal is pressed, another person goes back to Autowbrake. PRESS AND HOLD both stainless steel buttons on the Autowbrake until the LED indicator light is solid then release the buttons.
- When the LED indicator light stops flashing, the calibration process is complete. Your Autowbrake is calibrated.
- Release the brake pedal.
Confirming Key fob function/ power
Step 6: Selecting and Changing Autowbrake Settings
Check Autowbrake current setting:
-
Setting 1: One slow flash 3 times in a row (total 3 blinks) up to 3500 pounds
-
Setting 2: Two slow flashes 3 times in a row (total 6 blinks) 3500 – 6900 pounds
-
Setting 3: Three slow flashes 3 times in a row (total 9 blinks) 7,000 –20,000 pounds
-
We recommend you do not exceed your vehicle towing capacity
- Make sure trailer and tow vehicle are plugged in and ignition on (make sure vehicle lights are on if using option 2 for power source)
- One person press and hold the brake pedal down in the tow vehicle.
- 2nd person – While brake pedal is held down, press the right button (marked B) on the Autowbrake once and let go to increase setting, or press the left button (marked A) on the Autowbrake once and let go to decrease setting. Release brake pedal after you have done this. Now with the brake pedal released press the B button to check setting. Repeat process until you are on the desired setting (see settings above to determine if you are on 1,2 or 3)
- Autowbrake will always power up on the last setting used, so no need to do this each time you tow
SAFETY WARNING: It’s not recommended to exceed your vehicle trailer towing capacity.
Check Settings
You can check current setting anytime by pressing the right button/Gain on Autowbrake without depressing brakes anytime the trailer and tow vehicle are plugged into each other. See above chart again for LED indicator to determine setting.
Key fob Small Adjustment Buttons while braking
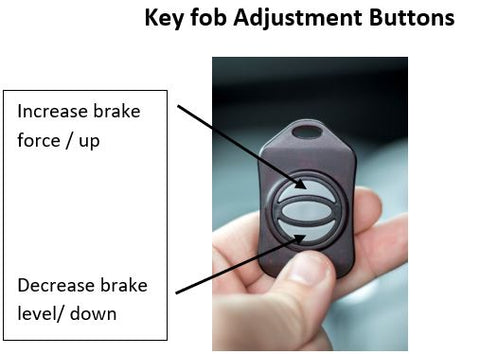
Key Fob Adjustment Functions
The key fob provides you the ability to make subtle changes in braking force while driving. Up button is used to increase braking force and down button is used to decrease braking force.To use this function brakes must be applied at the same time you press the key fob buttons
NOTE: You can increase braking up to 5 levels in your selected setting (example: if you are on setting 2, the fob will allow you to go from 2.0 up to 2.50). At a complete stop or while driving, press brake pedal down lightly and press the up button on the key fob. This increases your braking force level. If braking force level is too strong use the down button on the key fob instead of the up button. You must press and release the up or down button on the key fob each time for the setting to increase or decrease (Key fob image above) This will not change the Autowbrake setting from 1, to 2, to 3 and so forth. That must be done manually
Key Fob Function 2: Test brakes or assist in Sway control
Trailer Sway (All buttons on fob/ driving & not applying vehicle brakes)
If trailer sway occurs complete the following:
- Lift your foot from the accelerator and DO NOT step on the brake pedal unless you’re in danger of hitting something.
- Press all buttons on the key fob remote. You will feel the trailer brakes activate while you are using the vehicle accelerator pedal.
- Hold fob buttons down until trailer sway is reduced. Release fob button(s) and continue towing.
- If you are braking and using the key fob at the same time you will be adjusting brake force as described on previous page under key fob functions
If your trailer starts to sway on the road, the NHTSA recommends activating the manual brake control override by hand. Applying the tow vehicle brakes will generally make the sway worse in a sway situation.
Troubleshooting:
No LED light when attempting to calibrate > check wire color codes to confirm wired correctly.
No LED light when Autowbrake gain button is pressed > check wire color codes to confirm wired correctly.
HARD TRAILER BRAKING > check the currently setting. Top of Page 8 > Check settings. Press left button on Autowbrake. Any flashes mean that you have levels set by using the keyfob. Press on brake pedal and press furthest button away from the keyhole to reduce braking force.
Look for us on google, Facebook as well as our www.Getautowbrake.com for helpful videos or call us for support 7 days a week….Yes even holidays…………we are here for you
www.getautowbrake.com 319-521-2310
**NOT DESIGNED TO USE A MOTORCYCLE AS A TOW VEHICLE **
Quick Reference Guide: Autowbrake
Press and hold brake pedal > Have someone Press and hold BOTH buttons until you get a solid red LED, then release both buttons to calibrate.

Calibrate-press and hold both buttons until solid red led. Then release.
To check your current settings and levels release brake pedal.
Press right button. Count LED flashes for main setting. (3 total = setting 1) (6 total= setting 2) (9 total= setting 3)
Press left button. Count LED flashes for the FOB levels.
** KeyFOB: You must press brake pedal then press KeyFOB buttons to make an adjustment

Visual Aids


